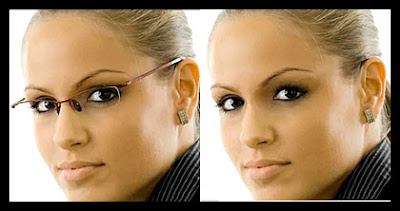
Remove Glasses in Photoshop

Description: This tutorial is about how to Remove Glasses in Photoshop. This tutorial basically covers Clone Stamp Tool and Healing Brush Tool. Some great tips and tricks for these two Photoshop tools. It also emphasizes on "Eye for Details" which is very essential if you are into post production or pre press industry. You can apply this Remove Glasses in Photoshop tutorial on removing other this as well.
Labels: Advance, Retouching
Photoshop Tutorials


wow! looks really good! its so clean. Its like the image has no glasses at all.
Posted by website design |
September 15, 2009 at 9:38 PM
Can you post a photoshop tutorial that can make an object look wet?
Posted by pool supply |
November 8, 2009 at 10:46 AM
can you remove the tint from sunglasses so it just looks like regular glasses?
Posted by Anonymous |
November 11, 2009 at 11:07 AM
nice tutorial...
thank you for sharing these video tutorial...
very clean work!
Posted by heizel |
November 15, 2009 at 11:28 PM
Hi! awesome! thank you
Posted by Muhammad |
January 21, 2010 at 12:01 AM
Thanks for the tutorial. The end result looks she never had glasses at all.
Posted by Las Vegas personal injury lawyer |
March 29, 2010 at 1:24 PM
Wow, this is cool! I'm just a beginner in Photoshop and this lesson is really helpful for amateurs like me. Last year, my dad hired a web designer (Toronto-based) for his business' website. Here in our hometown, Toronto, web design and development is well known for good services. That's why if you'll invest business here, then it would be easier for you to find affordable web development services.
Posted by Unknown |
November 23, 2010 at 1:29 AM
Wow very nice, i am looking for Photoshop tutorial right now am happy for that to see your post..interesting, thanks sharing your knowledge to post.
Posted by TV Series Planet |
January 4, 2011 at 6:34 PM
Thanks for the video tutorial.
Posted by Clipping Path |
January 24, 2011 at 12:58 AM
wow great work you did...
thanks for the post
Posted by Web Design India |
March 18, 2011 at 12:15 AM
Excellent tutorial....very inspiring and true skill using Photoshop.
Posted by Unknown |
June 2, 2011 at 4:01 AM
WOW THERE ALL SO NICE!!!
i love the snow background.
thx a lot for sharing.
Posted by Animation Institute |
June 10, 2011 at 2:34 AM
the good thing is it is a small area and you have some good areas to sample from around the glare to recreate the missing data. (i'm not familiar with elements, but i think most of the tools in photoshop are there, right?)
i'd zoom in to about 200 or 300% and use a clone brush about the size of a pencil eraser (as it appears on the screen at 200-300%) and sample from around the glare.
one thing that helps to keep you from destroying the good data is to make the area you want to work on a selection. that way only the glare area is worked on and your corrections dont spill out into the good area.
for this, use the lasso tool to select the glare, expand it by 2-3 pixels and put a 2-3 pixel feather on it (so you dont get any harsh edges).
Posted by social media melbourne |
June 23, 2011 at 3:14 AM
Looking smart.Thanks for the video tutorial.
Posted by Clipping Path Service |
August 4, 2011 at 2:23 AM
Very Nice...
Posted by Unknown |
September 28, 2012 at 12:03 AM
Thanks for a great post and interesting comments. I found this post while searching the web for free stuff. Thanks for sharing this post.
Posted by Web Designer |
March 5, 2013 at 11:54 PM